This post is not quite cooking related – it’s more of an Easter arts and crafts project – but I just couldn’t help sharing. Dying your Easter eggs naturally is such a great way involve the whole family, especially if you have a bit more time on your hands. You can even think of it as a science experiment, and just marvel at the results, as they slowly develop. Slowly is the key word here, and patience is required as these eggs will take a bit more time than you are normally used to, to reveal their beautiful colors, but the results are sure to blow your mind away!
It’s amazing how many things you can find in your kitchen that can turn into dyes – anything from tea, herbs or spices to fruits and veggies, roots and leaves. I am a big fan of all things natural, and especially when it’s something that you are going to put in your mouth, or body. A couple of years ago, I set upon researching the use of natural and safe ingredients to dye Easter eggs, and found quite a lot of useful information. I did not know what to expect honestly, but some of the pictures I’d seen were fantastic and gave me even more motivation to do this.
Somewhere after the time I put the eggs in the dyes, and checked on them a couple of hours later, only to see no difference or barely any, I thought this was one of those things that sounded too good to be true. But I left the eggs in the dyes overnight anyway, thinking I’ve got nothing to lose.
What I found the next morning was so incredibly awesome that I just felt like a scientist who made a wondrous discovery (well, almost!) And as always, the longer it takes for something to happen, the more excited you are, and the more you appreciate it when it does! I was so hyped about the results that I’ve been doing this every year since.
Another great thing about this project is that it produces unexpected and different results every time (albeit always great), no matter if you use the same ingredients! That makes it all the more exciting. This year, I tried a few new natural dyes, and there are still more that I want to explore next time.
Besides giving off colors, plants make wonderful natural stencils as well. When I was a kid, we had a lot of fun doing this by collecting interesting flowers, and leaves, then placing them on the eggs, and tightly wrapping the eggs with nylons before their dye bath. Some of the flower stencils will give off their own color, and the ‘print’ they leave will be tinted, but most often you end up with a blotchy white stencil that creates a wonderful natural effect.
Preparing the dyes
Whether you use raw veggies or fruits, spices or herbs, the procedure is pretty similar. You boil the plant material in water for 15 minutes to an hour, strain the liquid and add a tablespoon of vinegar, or other mordant like alum powder or baking powder. Color mordant is a substance that acts as an activator for the dye and helps it attach to the surface you’re dying, speeds up the process, and intensifies the color. I mostly use vinegar, but I’ve tried alum powder and baking powder.
RED
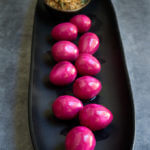
Of all the colors, red seems to be the most elusive, at least for me, which is a bit ironic, as this is the most traditional color to dye Easter eggs with. Even though I’ve tried the reddest of all red tinctures – strong hibiscus tea, beet juice, and cranberry juice, they do not produce anything close to red! The beets may be the only option, but I did not use them this year. What I’ve tried in the past was dipping the egg in fresh beet juice and leaving it there overnight. At first the egg turned a beautiful deep red, almost fuschia red color, but after a few hours and especially after drying, it turned into dark brownish red.
The more popular method seems to be boiling raw beets in water for 30 minutes or so, then using the liquid to dye the eggs. I am yet to try this! I’ve seen some pretty pinks and reds done with beets by Heather at Mommypotamous so I bet I just need to give it another try.
BLUE
The best dye, and the one that produces consistently vibrant colors, is the one derived from purple cabbage. You can get any shade of blue – from cobalt blue or robin blue to turquoise and even teal (if using brown eggs). This was the dye that took longest and was the most surprising. The dying liquid is actually pale purple, and over time a chemical reaction occurs that transforms the final color into the most stunning rich blues. Works every time without fail.
To prepare the blue dye: Boil 3-4 cups of roughly chopped purple cabbage with 4-5 cups of water for an hour (covered). You will get about 2 cups of dyeing liquid which should be enough for 3-4 eggs. Add 1 Tbs white vinegar to each cup of dye, and leave the eggs overnight for the richest deep blue colors.
You can use alum powder to speed up the process, in which case, the time will shorten to 2-3 hours (depending on how saturated you want it to be).
PURPLE
I played with a few new ingredients this year, and the big surprise was blueberries! They colored the eggs a deep shade of purple, almost black, if you leave the eggs for a few hours in the dye. You can vary the color shades and nuances by varying the times you leave the eggs in the dyes, and using different shade of white or beige eggs to begin with.
To prepare the purple dye: Use fresh or frozen blueberries and add 1 part blueberries to 1 – 1 1/2 parts water. Muddle the fruit and simply dip your egg in the liquid. I did not even add vinegar.
I have not tried blueberry tea, but that should work too.
GREY
Those deep blue-grey colors that look like starry skies or stones were mostly done with cranberry juice and strong hibiscus tea, and some were dipped in more than one dye.
To prepare brown-grey, or blue-grey dye: Use about 2/3 cup of dry hibiscus flowers to 1 1/2 cups of water, and brew for 15 minutes.
To prepare the lighter grey, stony color dye: I used 100% cranberry juice, without diluting with water. I added 1/4 tsp baking powder per cup of juice. No boiling required.
ORANGE
Another trusted ingredient that works like a charm, and always delivers rich colors is yellow onion skins. They run the gamut of light yellows to deep orange-brown but mostly produce rich earthly orange color. Again, leave them longer, for a richer hue or shorter for a nice bright yellow. Wrap a skin around the egg, and secure with elastic band, then dip in the dye for a mottled effect.
To prepare the orange dye: Collect skins from 2-3 pounds of onions (when you buy onions in bulk, grab some extra skins from the bin when nobody is looking 
YELLOW
For a lighter yellow, I’ve tried turmeric twice, with mixed results. This year my turmeric dye was weaker so I ended up dumping the turmeric-dyed eggs in the yellow onion dye for a nicer shade of yellow. Because turmeric does not dissolve in water it produces mottled effect which is a nice touch. I’ve had success in prior years with turmeric though, so I will definitely keep that in my arsenal. As I mentioned, the same ingredients may produce quite different results.
To prepare the yellow dye: Dissolve 1-2 Tbs of turmeric powder in 1 1/2 cups boiling water. Add 1/4 tsp baking powder.
GREEN
That’s a tricky color especially if you are after a true green. This year I experimented with dry lavender flowers and added a bit of turmeric for a grassy yellow-green, kind of mustard-color hue.
Another ingredient that surprisingly yielded green hue was red onion skins – the color was very similar to the lavender-dyed egg, but a bit stronger and more brownish-yellow than green.
For a dark forest green, dip a brown egg in red cabbage dye. I had one odd-ball egg that turned pretty bright blue-green this year from red cabbage, but I bet I will not be able to reproduce this next time
Another idea which I thought of doing and forgot until much later, was combining yellow onions and red cabbage. Since these are the strongest hues of blues and yellows, the two together should make a nice green, I believe. I’ll definitely try this next year.
To prepare green dye: Add 2 Tbs of dry lavender leaves + 1 tsp turmeric powder in 1 cup of water, and boil for 15 minutes.
Alternatively, prepare a dye from red onion skins, similarly to the yellow onion skins dye.
BEIGE and BROWN
I tried black tea infusion but thought it’s not strong enough so I added some instant coffee to it. The result was pale beige-yellow-brownish color – nice but not too deep. I will definitely try a stronger brew of coffee and tea separately next time.
To prepare the brown dye: I brewed 3 bags of black tea with 2 cups of water, until the liquid was reduced by half. I added 2 tsp instant coffee.
Notes:
- To make flower or leave stencils, collect your plant material, some old nylon socks, and rubber bands, then position the plants on the surface of the egg, and tightly wrap in the nylon sock, securing with a rubber band at one end so that the leave/flower does not move. Dip the wrapped egg in the dye, and after achieving the right color, leave to dry before unwrapping.
- If you feel a bit more geeky you can try adding different mordants to the same dye and see what produces the best results. If you do, please feel free to share your findings!
- Turmeric, blueberries, cranberry juice and hibiscus tea all produced a great mottled effect, while red cabbage and onion skins gave a solid intense color.
- Other ingredients to experiment with next time: avocado skins (for a dusty pink color) – I’ve had a great success coloring fabric with avocado skins, so that’s definitely something I want to try with eggs too. Grape juice for lavender or purple color. Strong coffee for a darker brown.
- Some other useful sources you can consider:
How to dye Easter eggs naturally
Naturlly dyed Easter eggs
Also, the March issue of Sunset magazine has a nice article on the subject.
If you give this a try, or know of other great ways to naturally color eggs, please do share your ideas!
Have fund and happy Easter!


Exactly what I was looking for, regards for putting up.
Thanks for reading! Hope it helps!